Shoes and a form of identification are the most important items to have with you during a weather emergency.

After an emergency, you may need to survive on your own for several days.

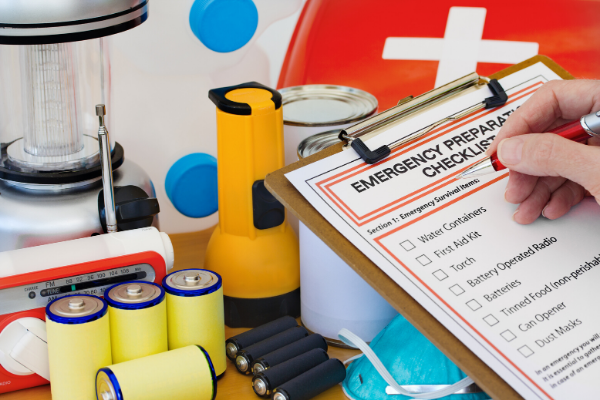
Being prepared means having your own foodwater and other supplies to last for at least 72 hours. A disaster supplies kit is a collection of basic items your household may need in the event of an emergency.

Make sure your emergency kit is stocked with the items on the checklist below. Most of the items are inexpensive and easy to find and any one of them could save your life. Headed to the store? Download a printable version to take with you. Once you take a look at the basic items consider what unique needs your family might have, such as supplies for pets or seniors.

Since you do not know where you will be when an emergency occurs, prepare supplies for home, work and cars.

  • Home: Keep this kit in a designated place and have it ready in case you have to leave your home quickly. Make sure all family members know where the kit is kept.

  • Work: Be prepared to shelter at work for at least 24 hours. Your work kit should include food, water and other necessities like medicines, as well as comfortable walking shoes, stored in a “grab and go” case.

  • Car: In case you are stranded, keep a kit of emergency supplies in your car.

Additional Resources

Make A Plan

make a plan

Make a plan today. Your family may not be together if a disaster strikes, so it is important to know which types of disasters could affect your area. Know how you’ll contact one another and reconnect if separated. Establish a family meeting place that’s familiar and easy to find.

Step 1: Put a plan together by discussing the questions below with your family, friends or household to start your emergency plan.

  1. How will I receive emergency alerts and warnings?

  2. What is my shelter plan?

  3. What is my evacuation route?

  4. What is my family/household communication plan?

  5. Do I need to update my emergency preparedness kit?

  6. Check with the Centers for Disease Control (CDC) and update my emergency plans due to Coronavirus.

    • Get cloth face coverings (for everyone over 2 years old), disinfectants, and check my sheltering plan.

Step 2:  Consider specific needs in your household.

As you prepare your plan tailor your plans and supplies to your specific daily living needs and responsibilities. Discuss your needs and responsibilities and how people in the network can assist each other with communication, care of children, business, pets or specific needs like operating medical equipment. Create your own personal network for specific areas where you need assistance. Keep in mind some these factors when developing your plan:

  • Different ages of members within your household

  • Responsibilities for assisting others

  • Locations frequented

  • Dietary needs

  • Medical needs including prescriptions and equipment

  • Disabilities or access and functional needs including devices and equipment

  • Languages spoken

  • Cultural and religious considerations

  • Pets or service animals

  • Households with school-aged children

Step 3: Fill out a Family Emergency Plan

Download and fill out a family emergency plan or use it as a guide to create your own.

Step 4: Practice your plan with your family/household

Basic Disaster Kit

Disaster Kit

To assemble your kit store items in airtight plastic bags and put your entire disaster supplies kit in one or two easy-to-carry containers such as plastic bins or a duffel bag.

A basic emergency supply kit could include the following recommended items:

  • Water (one gallon per person per day for at least three days, for drinking and sanitation)

  • Food (at least a three-day supply of non-perishable food)

  • Battery-powered or hand crank radio and a NOAA Weather Radio with tone alert

  • Flashlight

  • First aid kit

  • Extra batteries

  • Whistle (to signal for help)

  • Dust mask (to help filter contaminated air)

  • Plastic sheeting and duct tape (to shelter in place)

  • Moist towelettes, garbage bags and plastic ties (for personal sanitation)

  • Wrench or pliers (to turn off utilities)

  • Manual can opener (for food)

  • Local maps

  • Cell phone with chargers and a backup battery

  • Download the Recommended Supplies List (PDF)

Other Supplies

other supplies

Since Spring of 2020, the CDC has recommended people include additional items in their kits to help prevent the spread of coronavirus or other viruses and the flu.

Consider adding the following items to your emergency supply kit based on your individual needs:

  • Cloth face coverings (for everyone ages 2 and above), soap, hand sanitizer, disinfecting wipes to disinfect surfaces

  • Prescription medications

  • Non-prescription medications such as pain relievers, anti-diarrhea medication, antacids or laxatives

  • Prescription eyeglasses and contact lens solution

  • Infant formula, bottles, diapers, wipes and diaper rash cream

  • Pet food and extra water for your pet

  • Cash or traveler's checks

  • Important family documents such as copies of insurance policies, identification and bank account records saved electronically or in a waterproof, portable container

  • Sleeping bag or warm blanket for each person

  • Complete change of clothing appropriate for your climate and sturdy shoes

  • Fire extinguisher

  • Matches in a waterproof container

  • Feminine supplies and personal hygiene items

  • Mess kits, paper cups, plates, paper towels and plastic utensils

  • Paper and pencil

  • Books, games, puzzles or other activities for children

Maintaining

maintaning

After assembling your kit remember to maintain it so it’s ready when needed:

  • Keep canned food in a cool, dry place.

  • Store boxed food in tightly closed plastic or metal containers.

  • Replace expired items as needed.

  • Re-think your needs every year and update your kit as your family’s needs change.

Water

water

Store at least one gallon of water per person per day for three days, for drinking and sanitation. A normally active person needs about three quarters of a gallon of fluid daily, from water and other beverages. However, individual needs vary depending on age, health, physical condition, activity, diet and climate.

Take the following into account:

  • Children, nursing mothers and sick people may need more water.

  • A medical emergency might require additional water.

  • If you live in a warm weather climate more water may be necessary. In very hot temperatures, water needs can double.

Water Tips:

  • Never ration drinking water unless ordered to do so by authorities. Drink the amount you need today and try to find more for tomorrow. Minimize the amount of water your body needs by reducing activity and staying cool.

  • Drink water that you know is not contaminated first. If necessary, suspicious water, such as cloudy water from regular faucets or water from streams or ponds, can be used after it has been treated. If water treatment is not possible put off drinking suspicious water as long as possible but do not become dehydrated.

  • Do not drink carbonated or caffeinated beverages instead of drinking water. Caffeinated drinks and alcohol dehydrate the body which increases the need for drinking water.

Water Storage

Buy commercially bottled water and store it in the sealed original container in cool, dark place.

If you must prepare your own containers of water, purchase food-grade water storage containers. Before filling with chlorinated water, thoroughly clean the containers with dishwashing soap and sanitize the bottles by cleaning with a solution of one teaspoon of non-scented liquid household chlorine bleach to a quart of water. Water that has not been commercially bottled should be replaced every six months.

Water Treatment

If you have used all of your stored water and there are no other reliable clean water sources, it may become necessary to treat suspicious water. Treat all water of uncertain quality before using it for drinking, food washing or preparation, washing dishes, brushing teeth or making ice. In addition to having a bad odor and taste, contaminated water can contain microorganisms (germs) that cause diseases such as dysentery, cholera, typhoid and hepatitis.

There are many ways to treat water. Often the best solution is a combination of methods. Before treating, let any suspended particles settle to the bottom or strain them through coffee filters or layers of clean cloth.

Boiling

Boiling is the safest method of treating water. In a large pot or kettle, bring water to a rolling boil for one full minute, keeping in mind that some water will evaporate. Let the water cool before drinking.

Boiled water will taste better if you put oxygen back into it by pouring the water back and forth between two clean containers. This also will improve the taste of stored water.

Chlorination

You can use household liquid bleach to kill microorganisms. Use only regular household liquid bleach that contains 5.25 to 6.0 percent sodium hypochlorite. Do not use scented bleaches, color safe bleaches or bleaches with added cleaners.

Add 1/8 teaspoon of bleach per gallon of water, stir and let stand for 30 minutes. The water should have a slight bleach odor. If it doesn’t, then repeat the dosage and let stand another 15 minutes. If it still does not smell of chlorine, discard it and find another source of water.

Other chemicals, such as iodine or water treatment products sold in camping or surplus stores that do not contain 5.25 or 6.0 percent sodium hypochlorite as the only active ingredient are not recommended and should not be used.

Distillation

While boiling and chlorination will kill most microbes in water, distillation will remove microbes (germs) that resist these methods, as well as heavy metals, salts and most other chemicals. Distillation involves boiling water and then collection of only the vapor that condenses. The condensed vapor will not include salt or most other impurities.

To distill, fill a pot halfway with water. Tie a cup to the handle on the pot’s lid so that the cup will hang right-side-up when the lid is upside-down (make sure the cup is not dangling into the water) and boil the water for 20 minutes. The water that drips from the lid into the cup is distilled.

Car Safety

car safety

Plan long trips carefully and listen to the radio or television for up-to-date weather forecasts and road conditions. In bad weather drive only if absolutely necessary.

Emergency Kit for the Car

In case you are stranded, keep an emergency supply kit in your car with these automobile extras:

  • Jumper cables

  • Flares or reflective triangle

  • Ice scraper

  • Car cell phone charger

  • Blanket

  • Map

  • Cat litter or sand (for better tire traction)

Prepare Your Car for Emergencies

Have a mechanic check the following on your car before an emergency:

  • Antifreeze levels

  • Battery and ignition system

  • Brakes

  • Exhaust system

  • Fuel and air filters

  • Heater and defroster

  • Lights and flashing hazard lights

  • Oil

  • Thermostat

  • Windshield wiper equipment and washer fluid level

Car Safety Tips

  • Keep your gas tank full in case of evacuation or power outages. A full tank will also keep the fuel line from freezing.

  • Install good winter tires and make sure they have enough tread, or any chains or studs required in your local area.

  • Do not drive through flooded areas. Six inches of water can cause a vehicle to lose control or possibly stall. A foot of water will float many cars.

  • Be aware of areas where floodwaters have receded. Roads may have weakened and could collapse under the weight of a car.

  • If a power line falls on your car you are at risk of electrical shock. Stay inside until a trained person removes the wire.

  • If it becomes hard to control the car, pull over, stop the car and set the parking brake.

  • If the emergency could affect the stability of the roadway avoid overpasses, bridges, power lines, signs and other hazards.